The Ultimate Guide to the Windows 10 Media Creation Tool
In the world of PC maintenance, operating system upgrades, and troubleshooting, few tools are as powerful—or as misunderstood—as the Windows 10 Media Creation Tool. If you have ever needed to install Windows 10 on a new computer, reinstall it on a slow or infected machine, or create a backup installer, this small but mighty utility is your best friend. Yet, many people either avoid using it because they think it is too technical or use it incorrectly, leading to frustration.
This guide aims to change that. By the time you finish reading, you will know exactly what the Windows 10 Media Creation Tool is, why you need it, how to download it safely, and the step-by-step methods to use it for upgrading your current PC or creating installation media for another machine. We will cover common errors, troubleshooting tips, and best practices. Let us begin.
Related:
How to See What Version of Windows I Have (5 Fast & Easy Methods)
What Exactly Is the Windows 10 Media Creation Tool?
At its core, the Windows 10 Media Creation Tool is a free, official software application provided by Microsoft. Its primary job is to help you download the latest version of Windows 10 and prepare it for installation. Think of it as a bridge between Microsoft’s servers and your USB flash drive or DVD.
Before this tool existed, users had to find ISO files, burn them to discs using third-party software, and hope everything worked correctly. The Media Creation Tool simplifies this entire process. It automates the download of the correct Windows 10 files, verifies their integrity, and writes them onto a USB drive or creates an ISO file for you.
The tool serves two main purposes. First, it allows you to upgrade the computer you are currently using to Windows 10 while keeping your files, settings, and applications. Second, it lets you create separate installation media for a different computer, which is ideal if you are building a new PC or repairing a friend’s machine.
It is important to note that the tool itself is not Windows 10. Instead, it is a delivery system. When you run it, the tool contacts Microsoft’s servers, determines the most current version of Windows 10 available, and downloads exactly what you need based on your choices. This means you always get the latest updates built right into the installation files, saving hours of downloading patches after a fresh install.
Why You Should Never Download Windows 10 from Anywhere Else
The internet is full of websites offering Windows 10 downloads. Some of these are dangerous. They may bundle malware, adware, or unwanted programs into the installer. Others may provide outdated, corrupted, or even illegal versions of the operating system. The only safe source for Windows 10 is Microsoft directly, and the Windows 10 Media Creation Tool is the official vehicle for that download.
Using this tool ensures that every file you receive is digitally signed by Microsoft. It guarantees that no third party has tampered with the installation process. Additionally, the tool checks your current system for compatibility issues before it even begins. This can save you from the nightmare of starting an upgrade only to discover halfway through that your hardware is not supported.
Another reason to trust this tool is its simplicity. You do not need to be a computer expert. The tool asks you simple questions in plain English. It handles all the complex background work, such as partitioning the USB drive correctly and making it bootable. Without the tool, creating a bootable USB drive manually requires command-line instructions that most users find intimidating.
Downloading the Windows 10 Media Creation Tool Safely
Before you can use the tool, you must download it. This step sounds easy, but many people accidentally download the wrong file or land on fake download buttons. To stay safe, follow these precise instructions.
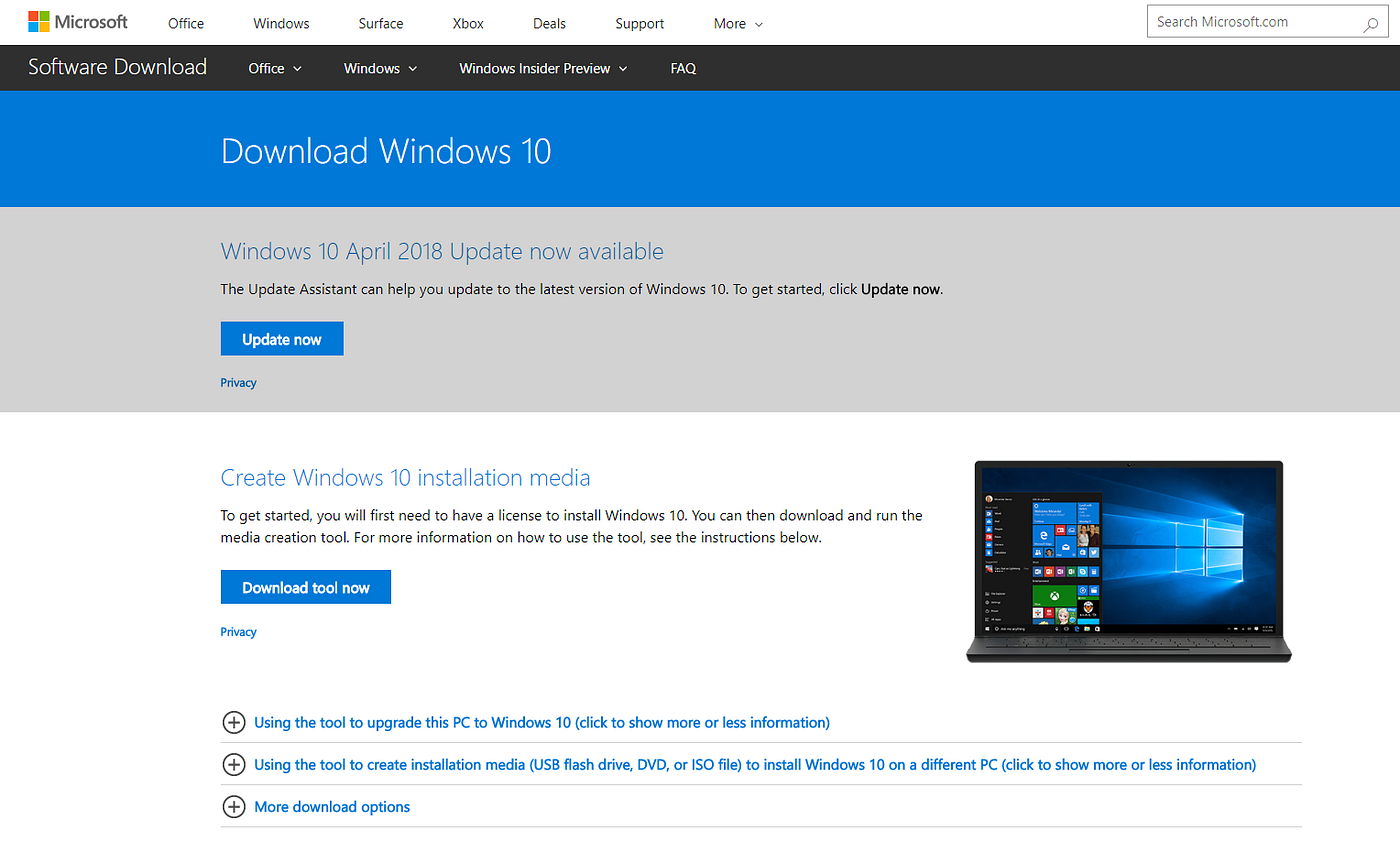
Open your web browser and go to the official Microsoft software download page. The address is clearly something like “microsoft.com/en-us/software-download/windows10”. You will know you are on the right page because the URL will start with “microsoft.com”. Do not trust any other domain, even if it looks similar, such as “microsoft-download.com” or “windows10-download.net”.
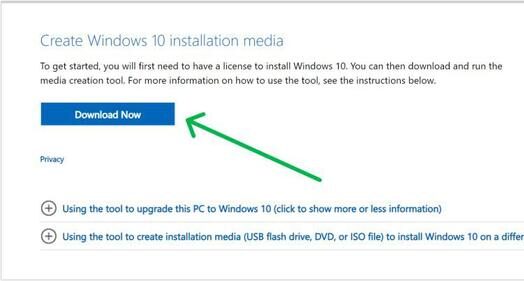
Once on the official page, you will see two options. One is for the Update Assistant, and the other is for the Media Creation Tool. Look for the button that says “Download tool now”. Click it. The file name will be something like “MediaCreationTool.exe”. Depending on your browser, it will save to your Downloads folder.
Before running the file, it is wise to check that you downloaded the correct version for your system. If you are on a 64-bit version of Windows, the tool will work fine. If you are on a 32-bit version, the tool will also adapt. However, if you are downloading on a non-Windows device, you cannot run the tool. You need a working Windows PC to create the installation media.
After the download finishes, navigate to your Downloads folder. Right-click the MediaCreationTool.exe file and select “Run as administrator”. This gives the tool the permissions it needs to make system-level changes, such as formatting a USB drive. Skipping this step can lead to permission errors later.
Preparing Your System and Backing Up Data
Before you launch the Windows 10 Media Creation Tool for any major task, you must take a few precautionary steps. These steps are not optional if you value your personal data.
First, back up everything important. While the upgrade process usually keeps your files safe, unexpected errors can occur. Power outages, sudden crashes, or even a faulty hard drive can interrupt the installation and lead to data loss. Copy your documents, photos, videos, and any project files to an external hard drive or a cloud storage service. This backup is your safety net.
Second, ensure your PC is plugged into a power source if it is a laptop. Running out of battery during a Windows installation can corrupt your system and leave you unable to boot. Third, temporarily disable your antivirus software. Some antivirus programs mistakenly flag the Media Creation Tool as suspicious because it writes to boot sectors and USB drives. Disabling the antivirus just during the creation process prevents these false alarms. Remember to turn it back on afterward.
Fourth, if you are creating installation media on a USB drive, understand that the tool will format that drive. Formatting erases everything on the drive. So, if your USB stick contains any family photos, work documents, or other files, move them elsewhere before proceeding. The tool needs a clean, empty drive to write the Windows 10 installation files.
Finally, close all other open programs. The Media Creation Tool consumes significant bandwidth and CPU power. Having a dozen browser tabs open or a game running in the background can slow down the process or cause timeouts. A clean environment ensures a smooth experience.
Using the Tool to Upgrade Your Current PC
The simplest use of the Windows 10 Media Creation Tool is upgrading the computer you are currently sitting at. This is perfect if you are still on Windows 7, Windows 8, or an older version of Windows 10 and want to move to the latest version without losing anything.
After running the tool as administrator, you will see a window asking what you want to do. You have two choices: “Upgrade this PC now” and “Create installation media for another PC”. For an immediate upgrade, select the first option and click Next.
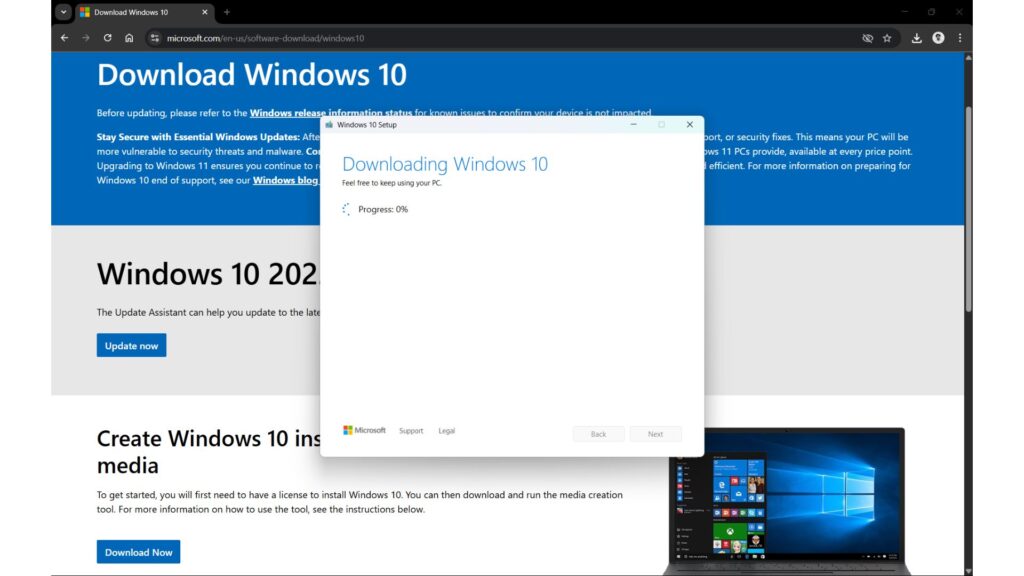
The tool will then begin downloading the latest Windows 10 files. This download can take anywhere from 15 minutes to over an hour, depending on your internet speed. The tool shows you a progress bar and the current download percentage. During this time, you can still use your computer for basic tasks, but you may notice slower performance.
Once the download completes, the tool automatically verifies the files to ensure nothing was corrupted during the transfer. After verification, it asks you to accept the license terms. Read them if you wish, but in short, they allow Microsoft to collect diagnostic data and provide updates.
Then comes the most important screen: “Choose what to keep”. You have three options. The first is “Keep personal files and apps”. This preserves everything, including your installed programs, documents, and settings. The second is “Keep personal files only”. This keeps your documents and photos but removes all your installed software. The third is “Nothing”, which performs a clean installation, wiping the entire drive. For most people upgrading from an older Windows version, the first option is best.
After making your choice, click Install. Your computer will restart several times during the process. Do not turn off your PC, unplug it, or force a shutdown. The screen may go black for a few minutes, or you may see a spinning circle of dots. This is normal. The entire upgrade process can take between 30 minutes and two hours. When it finishes, you will see your familiar desktop, but with the latest version of Windows 10 running underneath.
Creating a Bootable USB Drive for Another Computer
The second major function of the Windows 10 Media Creation Tool is creating installation media for another PC. This is the preferred method for building a new computer, performing a clean install on a machine that is running poorly, or installing Windows on a device without an operating system.
To begin, run the tool as administrator and choose “Create installation media for another PC”. Click Next. The tool then asks for your language, edition, and architecture. In most cases, you can check the box that says “Use the recommended options for this PC”. This automatically selects the correct settings for the computer you are currently using. However, if you are creating media for a different machine, uncheck that box and manually select the appropriate options.
For architecture, you generally choose 64-bit for modern computers, 32-bit for very old machines, or both if you are unsure. The “both” option creates a larger USB drive that can install either version, but it requires more space.
After you confirm your choices, the tool asks you to choose which media to use. You have two choices: USB flash drive or ISO file. For most people, the USB flash drive is the simplest and fastest option. Select that, insert a blank USB drive with at least 8 GB of space, and choose it from the list. The tool warns you that it will format the drive. Confirm that you are ready, and the tool begins downloading and writing the files.
Writing the files to the USB drive can take 20 to 40 minutes. When finished, you have a bootable Windows 10 installer. Safely eject the USB drive and use it on any compatible computer. To boot from it, insert the USB into the target computer, restart, and press the appropriate key (often F12, ESC, or DEL) to access the boot menu. Select the USB drive, and the Windows installation process begins.
Creating an ISO File for Advanced Users
The Windows 10 Media Creation Tool also allows you to create an ISO file. An ISO file is a single, large file that represents an entire disc. This option is useful if you want to burn the installation to a DVD, mount the ISO directly in a virtual machine, or keep a copy of Windows 10 on your hard drive for later use.
To create an ISO file, follow the same steps as creating a USB drive, but when the tool asks “Choose which media to use”, select “ISO file”. Choose a location on your computer to save the file, such as your Desktop or a dedicated Downloads folder. The tool then downloads Windows 10 and packages it into an ISO file.
Once the ISO file is created, you can double-click it to mount it as a virtual DVD drive. From there, you can run Setup.exe to upgrade your current PC. Alternatively, you can use free software like Rufus or the built-in Windows USB/DVD Download Tool to write that ISO file to a USB drive at a later time. The ISO option gives you more flexibility, but it requires an extra step compared to the direct USB creation.
Common Errors and How to Solve Them
No tool is perfect, and the Windows 10 Media Creation Tool can sometimes run into problems. Knowing how to fix the most common errors will save you hours of frustration.
One frequent error is “There was a problem running this tool. We are not sure what happened.” This vague message often results from a corrupted download of the tool itself. To fix it, delete the MediaCreationTool.exe file you downloaded, clear your browser cache, and download it again from the official Microsoft website. Also, try running the tool on a different internet connection, as some corporate networks block the download servers.
Another common issue is “We couldn’t create a new partition or locate an existing one.” This error appears when the USB drive has a partition style that the tool does not like. The solution is to open Disk Management, delete all partitions on the USB drive, create a new simple volume, and format it as FAT32. Then try the tool again.
A third problem occurs when the tool freezes at a certain percentage, usually around 50% or 99%. This is often caused by antivirus software or a slow internet connection. Disable your antivirus temporarily. If that does not work, pause other bandwidth-heavy activities like streaming video or online gaming. You can also try connecting your computer directly to your router with an Ethernet cable for a more stable connection.
Finally, some users see “Error 0x80042405 – 0xA001A.” This indicates that the USB drive is not recognized as bootable. The simplest fix is to try a different USB drive. Older or low-quality flash drives sometimes fail during the writing process. Use a reputable brand like SanDisk, Kingston, or Samsung, and ensure it is USB 3.0 for faster speeds.
Using the Media Creation Tool for a Clean Install
A clean install means wiping your hard drive completely and installing a fresh copy of Windows 10. This is the best way to fix persistent slowdowns, remove stubborn malware, or start fresh on a new SSD.
To perform a clean install, first use the tool to create a bootable USB drive as described earlier. Then, insert that USB drive into the computer you want to clean install on. Restart the computer and boot from the USB. When the Windows Setup screen appears, select your language and click Next. Then click “Install now”.
If you have a product key, enter it now. If not, click “I don’t have a product key” to continue. Windows will allow you to install and use it with limited personalization options until you enter a valid key later.
When asked which type of installation you want, choose “Custom: Install Windows only (advanced)”. This takes you to a screen showing your hard drive partitions. Delete each partition until only one entry remains labeled “Unallocated Space”. Then select that unallocated space and click Next. Windows automatically creates the necessary partitions and begins copying files.
The clean install takes about 20 to 30 minutes on modern hardware. Your computer will restart several times. After the final restart, you go through the out-of-box experience, where you set up your region, keyboard layout, Microsoft account, and privacy settings. When finished, you have a brand new, fast, and clean version of Windows 10.
Best Practices After Installation
Your work does not end once Windows 10 is installed. To keep your system running smoothly, follow these best practices.
First, run Windows Update repeatedly until no more updates are available. Even if you used the Media Creation Tool recently, Microsoft releases security patches and driver updates almost daily. Go to Settings, Update and Security, and click Check for updates. Install everything, restart as needed, and check again until you see “You are up to date”.
Second, install your essential drivers. While Windows Update catches most drivers, your graphics card and motherboard chipset drivers often come directly from the manufacturer. Visit the website of your PC brand or the individual component makers, like NVIDIA, AMD, or Intel, and download the latest drivers.
Third, reinstall your favorite applications. A clean install removes everything, so you need to reinstall your browser, office suite, antivirus, and other tools. This is also a great opportunity to leave behind old software you no longer use.
Fourth, create a system restore point. Once your system is perfectly configured, type “Create a restore point” in the Windows search bar. Open it, select your system drive, and click Create. Name it something like “Fresh Clean Install”. This allows you to roll back if something goes wrong later.
Finally, consider making another USB drive with the Windows 10 Media Creation Tool and storing it in a safe place. Having a recovery drive on hand means you are never more than 20 minutes away from a working computer, even if your hard drive fails completely.
Frequently Asked Questions
Do I need a product key to use the Media Creation Tool? No. The tool itself is free and works without a key. However, to activate Windows 10 after installation, you need a valid license. If you previously had a genuine copy of Windows 10 on that same computer, it usually activates automatically.
Can I use the tool to downgrade from Windows 11? No. The Windows 10 Media Creation Tool only downloads and installs Windows 10. If you are on Windows 11 and want to go back, you must perform a clean install from a Windows 10 USB drive, which will erase all your files.
How long does the tool stay relevant? Microsoft updates the tool regularly. Even if you downloaded it months ago, when you run it, it will automatically download the latest Windows 10 version. However, if the tool itself is very old, download a fresh copy from the website.
Can I use the tool on a Mac? No. The executable file only runs on Windows. To create a Windows 10 installer on a Mac, you need to use a different method, such as downloading the ISO from Microsoft and using the Boot Camp Assistant.
Is the tool safe for work computers? Yes, but you may need administrator permissions. Many corporate IT departments block local users from running system-level tools. Check with your IT team before proceeding.
Conclusion
The Windows 10 Media Creation Tool is one of the most valuable free utilities ever released by Microsoft. It democratizes the process of installing and reinstalling Windows, putting professional-grade tools into the hands of everyday users. Whether you are upgrading a slow laptop, building a gaming desktop, or helping a friend fix their PC, this tool gives you the power to get the job done correctly and safely.
Remember the key points: always download the tool from Microsoft’s official website, back up your data before starting, choose the correct option for your situation, and be patient during the download and installation phases. A little preparation goes a long way in preventing data loss and frustration.
Now that you have read this guide, you are no longer a beginner. You understand exactly what the tool does, how it works, and how to troubleshoot common problems. The next time someone tells you their computer is acting up, you can confidently say, “Let me get my Windows 10 Media Creation Tool USB drive.” And you will be the hero who saves the day.