How to Screen Record on Mac: Step-by-Step Guide for Beginners
Introduction
If you’ve ever wanted to create a tutorial, record an online class, save a video call, or capture gameplay footage, learning how to screen record on Mac is an essential skill. Fortunately, Apple makes the process simple by including built-in screen recording tools in macOS. Unlike some operating systems that require additional software, Mac users can start recording their screens immediately without downloading anything.
Screen recording has become increasingly popular among students, teachers, remote workers, business professionals, and content creators. Whether you’re demonstrating how to use software, troubleshooting a technical issue, or creating content for YouTube, a screen recording can communicate information more effectively than written instructions alone.
The good news is that modern Mac computers include powerful tools that allow you to record your entire screen, capture a specific section of your display, and even record audio simultaneously. In this guide, you’ll learn everything you need to know about how to screen record on Mac, including built-in methods, audio recording options, editing tips, and solutions to common recording problems.
Related
What Is Screen Recording?
Screen recording is the process of capturing everything that happens on your computer screen and saving it as a video file. Unlike a screenshot, which captures a single image, screen recording creates a video that shows mouse movements, clicks, application interactions, presentations, and other on-screen activities.
People use screen recording for many purposes, including:
- Creating software tutorials
- Recording online meetings
- Saving webinars and presentations
- Capturing gameplay footage
- Producing educational content
- Demonstrating technical solutions
- Reporting software bugs
- Creating training materials
Because screen recordings provide visual demonstrations, they are often more effective than written instructions when explaining complex processes.
Why Learn How to Screen Record on Mac?
There are countless situations where screen recording can be useful. Students often record online lectures to review later, while professionals may record virtual meetings for reference. Businesses use screen recordings for employee training and product demonstrations, while content creators rely on them to produce tutorials and educational videos.
Learning how to screen record on Mac can help you:
Improve Communication
Visual demonstrations are easier to understand than long written explanations. Instead of typing detailed instructions, you can simply record your screen and show someone exactly what to do.
Save Important Information
Online presentations, webinars, and meetings often contain valuable information. Recording them allows you to revisit key points whenever necessary.
Create Professional Content
YouTube tutorials, software demonstrations, and online courses often rely on high-quality screen recordings. Understanding how to record your screen helps you create engaging content for your audience.
Simplify Technical Support
When troubleshooting a problem, a screen recording can clearly show what is happening. This can make it easier for support teams to diagnose and solve issues.
Mac Screen Recording Requirements
Before you begin, make sure your Mac meets a few basic requirements.
First, ensure your device is running a relatively recent version of macOS. The Screenshot Toolbar introduced in macOS Mojave provides the easiest screen recording experience and remains available in newer versions of macOS.
You should also verify that you have enough available storage space. Screen recordings can become quite large, especially if you record for extended periods or use high-resolution displays.
Additionally, if you plan to record narration, make sure your microphone is working correctly. Most Mac computers include a built-in microphone, but an external microphone often provides better audio quality.
Method 1: How to Screen Record on Mac Using Screenshot Toolbar
The easiest and most commonly used method is the Screenshot Toolbar. Apple introduced this feature to simplify screenshot and screen recording tasks.
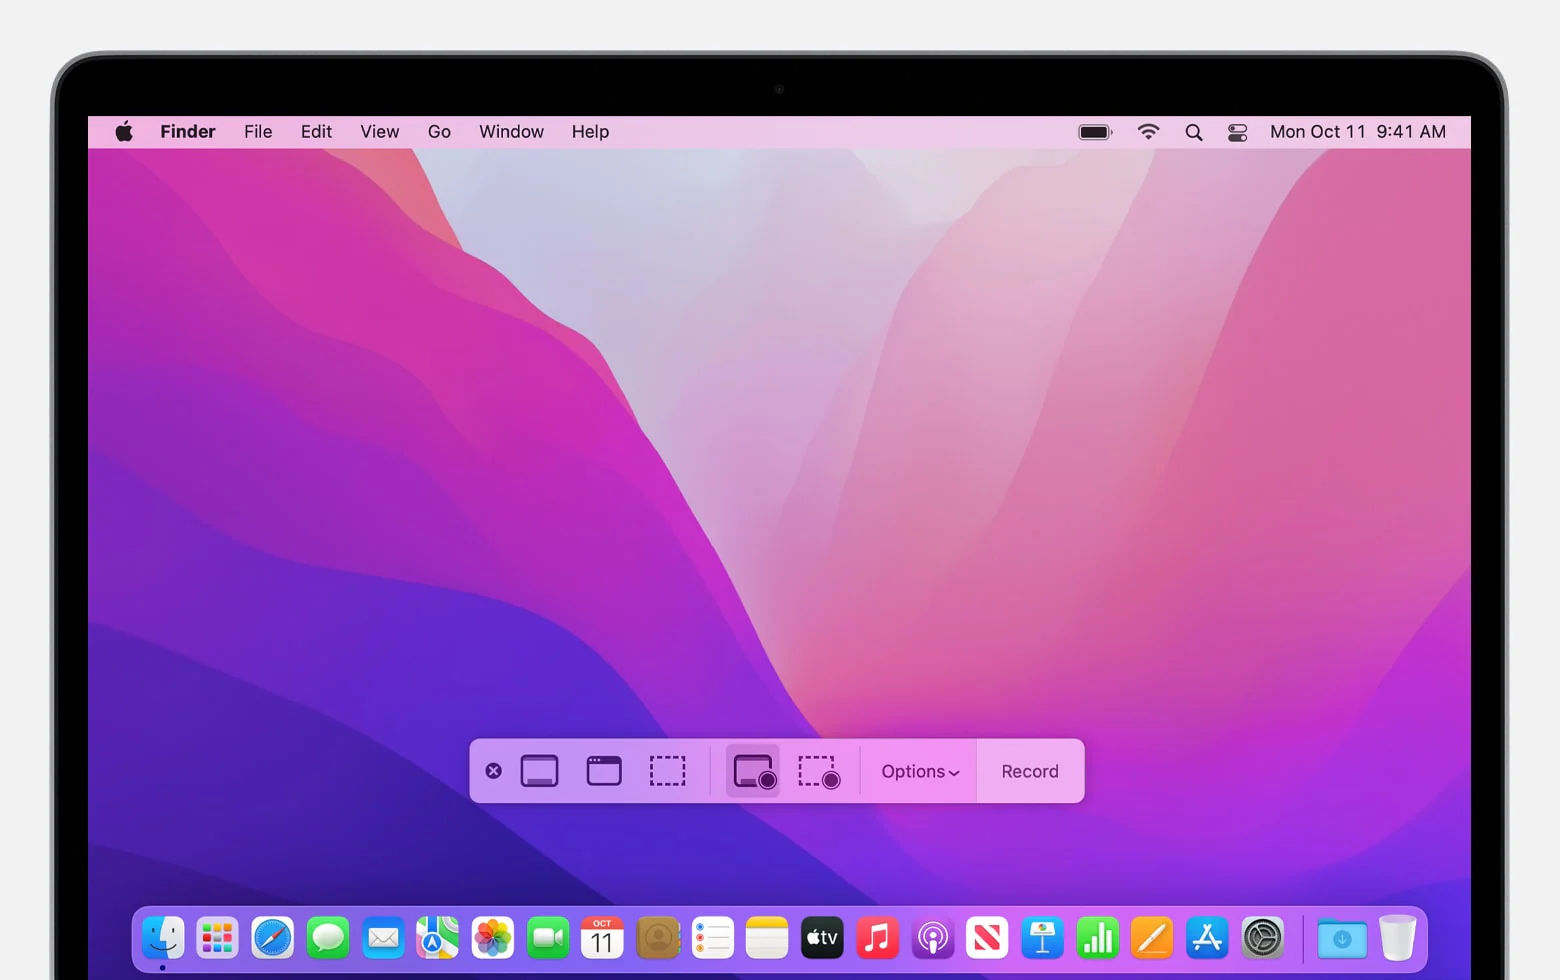
To open the Screenshot Toolbar, press Command + Shift + 5 on your keyboard. A control panel will appear near the bottom of the screen.
This toolbar provides several options, including:
- Capture Entire Screen
- Capture Selected Window
- Capture Selected Portion
- Record Entire Screen
- Record Selected Portion
If you want to capture everything visible on your display, choose the Record Entire Screen option. If you only want to record a specific area, select Record Selected Portion.
Once you’ve chosen your preferred option, click the Record button to begin recording.
During the recording session, everything displayed within the selected area will be captured and saved as a video file.
How to Stop a Screen Recording
When you’re finished recording, stopping the recording is simple.
You can click the Stop Recording button located in the menu bar at the top-right corner of the screen. Alternatively, you can use the keyboard shortcut Command + Control + Esc.
After stopping the recording, a thumbnail preview usually appears briefly in the corner of the screen. Clicking the thumbnail allows you to review, trim, or edit the recording before saving it.
The completed video is typically saved to your Desktop unless you’ve selected a different save location.
How to Change Recording Settings
Before starting a recording, it’s worth reviewing the available settings.
Press Command + Shift + 5 and then click the Options button on the toolbar.
From here, you can customize several important settings, including:
- Save location
- Recording timer
- Microphone selection
- Mouse click visibility
- Floating thumbnail behavior
These settings allow you to tailor the recording process to your specific needs.
For example, if you’re creating a tutorial, enabling microphone recording lets you explain each step while demonstrating it on screen.
How to Screen Record on Mac With Audio
Many users want to record both their screen activity and voice narration at the same time.
Fortunately, macOS makes this easy.
Open the Screenshot Toolbar using Command + Shift + 5 and click Options. Under the Microphone section, choose your preferred microphone.
You may select:
- Built-In Microphone
- External USB Microphone
- Bluetooth Microphone
Once selected, your voice will be recorded alongside your screen activity.
This feature is especially useful for educators, trainers, and content creators who need to provide spoken explanations during recordings.