The Complete Guide to Uninstalling Applications on macOS
While this statement contains a kernel of truth, it is dangerously incomplete. Unlike Windows, which has a centralised “Add or Remove Programs” control panel, macOS distributes application files across multiple system folders. Dragging an app to the Trash removes the core executable (the .app bundle), but it often leaves behind a digital graveyard of preferences, caches, logs, and support files. Over time, these “orphaned” files accumulate, consuming gigabytes of storage and potentially causing software conflicts.
Related:
How to Update and Upgrade Linux System Safely
Understanding the macOS File System for Applications
Before executing any uninstalling applications, you must understand the anatomy of a macOS application. An .app file is not a single file; it is a package—a special folder that macOS treats as a single item. Right-click any application in the Applications folder and select “Show Package Contents.” Inside, you will find a standardized structure: Contents/, MacOS/ (containing the binary executable), Resources/ (icons and images), and Info.plist (configuration).
However, when an app runs for the first time, it spawns additional files outside its own package. These live in standardized directories:
| Directory Path | Purpose | Example |
|---|---|---|
~/Library/Application Support/ | App-specific data, save games, profiles | ~/Library/Application Support/Spotify/ |
~/Library/Preferences/ | Settings stored as .plist files | com.adobe.Photoshop.plist |
~/Library/Caches/ | Temporary data to speed up performance | ~/Library/Caches/Google Chrome/ |
~/Library/Logs/ | Crash reports and diagnostic logs | ~/Library/Logs/Steam/ |
/Library/ (root level) | System-wide data for all users | /Library/Application Support/Microsoft/ |
Key takeaway: Dragging the .app to Trash removes only the package. All the support files listed above remain. To perform a complete uninstall, you must manually or automatically hunt down these orphaned files.
Method 1 – The Simple Drag to Trash (Basic Uninstall)

When to Use This Method
- You are uninstalling simple, “self-contained” apps that do not create large support files (e.g., a small calculator widget, a single-purpose tool like
The Unarchiver). - You are in a hurry and don’t care about leftover preference files (which are usually only a few KB).
- You are preparing to reinstall the same app and want to preserve your settings (leftover preferences will be read again upon reinstall).
Step-by-Step Instructions
- Open a new Finder window.
- In the sidebar, click Applications.
- Locate the application you want to remove.
- Drag its icon from the Applications folder to the Trash icon in your Dock.
- Alternatively, select the app and press Command (⌘) + Delete.
- To complete the removal, empty the Trash: Right-click the Trash icon and select “Empty Trash,” or press Shift + Command + Delete.
What Remains After This Method?
- All files in
~/Library/Application Support/ - All preferences (
~/Library/Preferences/) - All caches (
~/Library/Caches/) - Launch agents or daemons installed by the app (which may cause “missing service” error logs)
Verdict: This is a “dirty” uninstall. Acceptable for tiny apps, but poor hygiene for complex software like Adobe Creative Cloud, Microsoft Office, or development tools.
Method 2 – Using the App’s Own Uninstaller (Recommended)
Many professional and complex applications include a dedicated uninstaller tool. This is the gold standard because the developer knows exactly which files they scattered across your system.
Which Apps Typically Include an Uninstaller?
- Adobe products (Creative Cloud)
- Microsoft Office for Mac
- Steam (the gaming client)
- VirtualBox / VMware Fusion
- Dropbox / Google Drive File Stream
- Native Instruments (audio software)
How to Find and Run the Uninstaller
- Check the Applications folder: Some uninstallers live right next to the main app (e.g.,
Adobe Creative Cloud Uninstaller.app). - Look inside a “Utilities” subfolder: For example, Microsoft Office places its uninstaller at
/Applications/Microsoft Office 2016/Office Reset.app(note: newer versions use “Microsoft AutoUpdate” for removal). - Check the original
.dmgdisk image: Some developers include the uninstaller only in the installer package you downloaded. - Search the developer’s documentation: If you can’t find it, search “[App Name] uninstaller location.”
Example: Uninstalling Adobe Photoshop (Using Creative Cloud Desktop)
- Open Adobe Creative Cloud desktop app.
- Go to the Apps tab.
- Click the three dots (
...) next to Photoshop. - Select Uninstall.
- Adobe’s cleaner will remove not only the
.appbut also licensing files, font caches, and plugin data.
Example: Uninstalling Microsoft Office
- Microsoft no longer provides a simple uninstaller. Instead, use the “License Removal Tool” or manually run the
Microsoft Office Reset.appfrom the Office folder. For a complete removal, Microsoft publishes a support article with a “Uninstall Office for Mac” tool you can download.
Verdict: Always check for an official uninstaller first. It is the only method guaranteed not to leave broken dependencies.
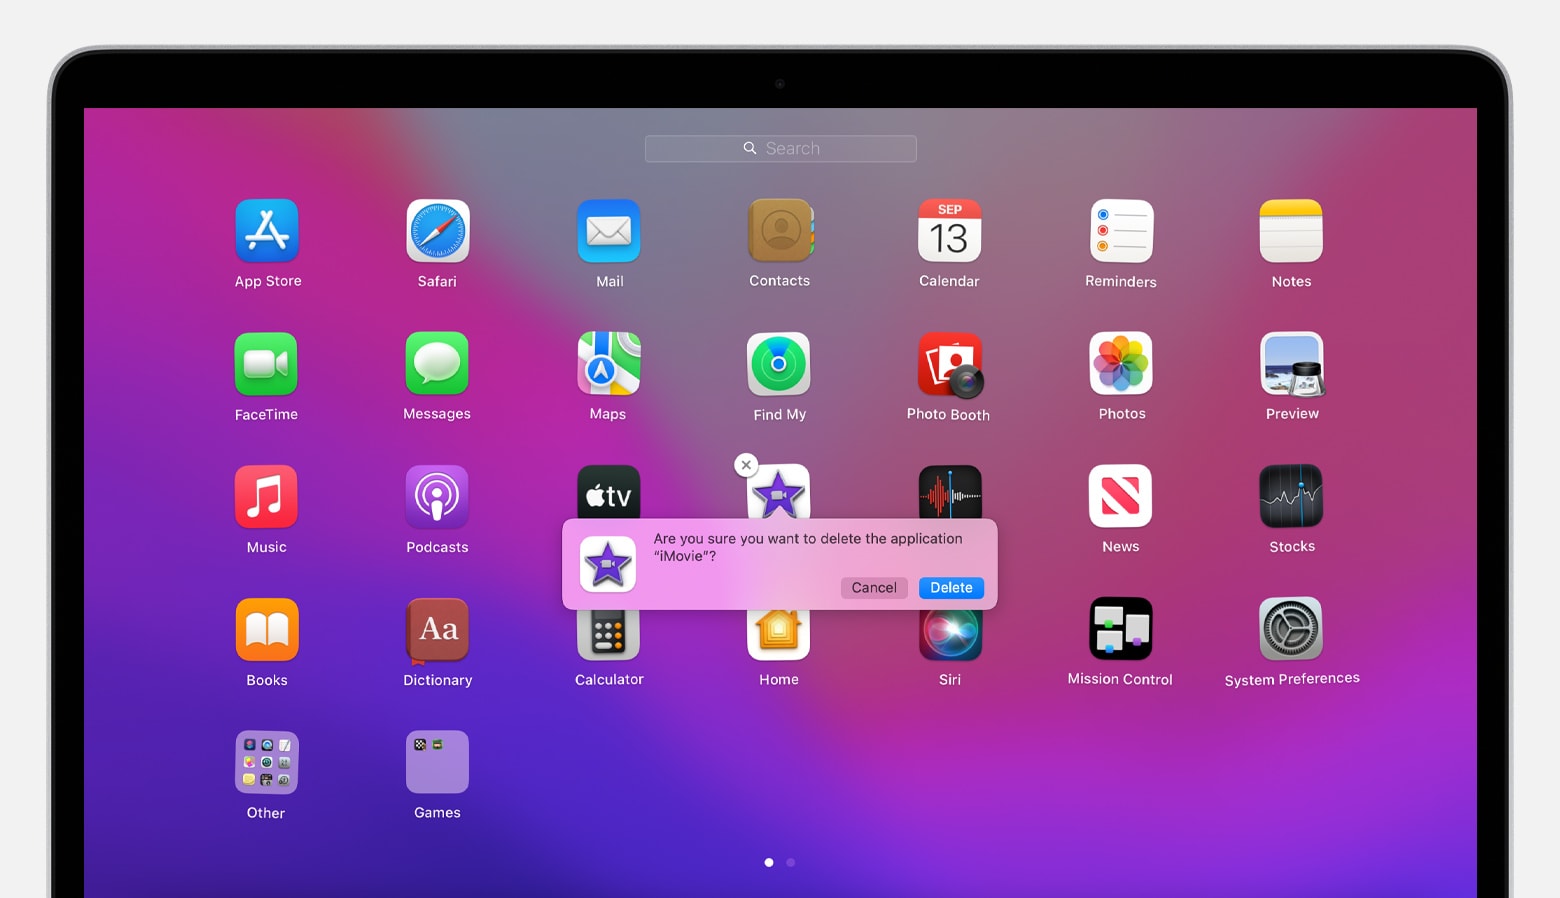
Method 3 – Uninstalling from Launchpad (App Store Apps Only)
If you downloaded an application from the Mac App Store, macOS provides a streamlined removal method via Launchpad. This method is functionally identical to drag-to-trash, but more visual.
Steps:
- Open Launchpad (pinch with thumb and three fingers on trackpad, or click its rocket icon in the Dock).
- Find the app you want to remove. You can search using the search bar at the top.
- Click and hold on the app icon until all icons start jiggling (like on an iPhone).
- Click the small “X” button that appears on the top-left corner of the app icon.
- Click Delete to confirm.
Important Limitations:
- This only works for apps downloaded from the Mac App Store. Third-party apps (downloaded from the web) will not show an X button.
- Like drag-to-trash, this method leaves behind library files.
- Some Apple system apps (Safari, Mail, Messages) cannot be deleted this way.
Verdict: Convenient for App Store apps, but still an incomplete uninstall.
Method 4 – Manual Cleanup After Drag-to-Trash (Advanced Users)
For users who want a thorough uninstall without installing third-party software, you can manually scour the Library folders. This requires patience and careful attention—deleting the wrong file can destabilize other apps.
Step 1: Make Hidden Files Visible
By default, macOS hides the ~/Library folder for your protection. To reveal it:
- Open Finder.
- Press Shift + Command + Period (.) – this toggles hidden files.
- Alternatively, in Finder’s menu bar, click Go > Go to Folder… and type
~/Library.
Step 2: Search for the App’s Name or Developer’s Name
Navigate to these five directories and look for folders or files containing the app name or its developer ID (e.g., “Google”, “Microsoft”, “JetBrains”):
| Directory | Common Items to Delete |
|---|---|
~/Library/Application Support/ | Entire folders named after the app |
~/Library/Preferences/ | Files ending in .plist (e.g., com.spotify.client.plist) |
~/Library/Caches/ | Folders named after the app or developer |
~/Library/Logs/ | Log files with the app’s name |
~/Library/LaunchAgents/ | Files that auto-start background processes |
Step 3: Also Check System-Wide Library
Repeat the search in /Library/ (the root Library, not your user Library). This requires admin privileges:
/Library/Application Support//Library/Preferences//Library/LaunchDaemons/(background services that run even when no user is logged in)
Step 4: Delete and Empty Trash
After dragging all the orphaned items to the Trash, restart your Mac. Some locked files may only release upon reboot. Then empty the Trash.
Warning: Do not delete files you are unsure about. When in doubt, leave them. A leftover 4KB preferences file is harmless; a deleted system framework is catastrophic.
Method 5 – Third-Party Uninstaller Apps (The Pragmatic Choice)
Because manual cleanup is tedious and error-prone, a cottage industry of uninstaller utilities has emerged. These apps scan your system, show you all files associated with a target app, and delete them in one click.
Top 5 macOS Uninstaller Tools (2025 Edition)
| App Name | Price | Key Feature |
|---|---|---|
| AppCleaner | Free | Simple, lightweight, shows all related files instantly |
| CleanMyMac X | Paid ($39.95/yr) | Uninstaller + system optimizer, one-click leftovers removal |
| Hazel | Paid ($42) | Automates rules; can auto-delete leftovers from uninstalled apps |
| TrashMe 3 | Paid ($9.99 one-time) | Focuses on clean uninstalls with leftover detection |
| Pearcleaner | Free (open source) | Modern SwiftUI interface, similar to AppCleaner |
How to Use AppCleaner (Free, Recommended)
- Download and install AppCleaner (it’s free and notarized by Apple).
- Launch AppCleaner.
- Drag the application you want to uninstall from the Applications folder into the AppCleaner window.
- AppCleaner instantly scans and displays all associated files:
- The main
.appbundle - Preferences plists
- Application Support folders
- Caches
- Launch agents
- The main
- Uncheck any file you want to keep (e.g., you might want to keep preferences if you plan to reinstall).
- Click Remove.
- Confirm by moving items to Trash.
Why this is the best method for most users: It combines the simplicity of drag-to-trash with the thoroughness of manual search. And it’s reversible—you can inspect everything before deletion.
Method 6 – Terminal Commands for Power Users (Uninstalling via CLI)
For developers, sysadmins, or users comfortable with the command line, the Terminal offers the most surgical approach. You can uninstall apps and nuke their leftovers with a few commands.
Uninstalling a Simple App via Terminal
# Move the .app to Trash (equivalent to drag-and-drop)
mv /Applications/ExampleApp.app ~/.Trash/

# Empty the Trash (be careful!)
rm -rf ~/.Trash/ExampleApp.app
Finding and Deleting Leftovers with find and grep
Here’s a command that searches your entire user Library for files containing the app name:
find ~/Library -iname "*ExampleApp*" -type f -or -type d 2>/dev/null-iname= case-insensitive name match-type f= files,-type d= directories2>/dev/null= suppress permission errors
To delete all findings after careful review, pipe to -exec rm -rf {} \;:
find ~/Library -iname "*ExampleApp*" -exec rm -rf {} \; 2>/dev/nullUsing pkgutil to Uninstall Installed Packages
If you installed an app via a .pkg installer (common for printers, drivers, or developer tools), macOS keeps a receipt. List all installed packages:
pkgutil --pkgs | grep -i "partialname"Then forcefully remove the package contents:
pkgutil --forget com.developer.exampleapp.pkgThis only removes the receipt; you still need to manually delete the files. For a true package uninstall, use the developer’s uninstall script (often located in /usr/local/ or /opt/).
Danger Zone: Never run sudo rm -rf without absolute certainty. One wrong character can delete your entire system.
How to Uninstall Stubborn or Protected Apps
Some applications refuse to be deleted. They may be running, protected by System Integrity Protection (SIP), or installed as system extensions.
Case A: “The item is in use” Error
- Solution: Open Activity Monitor (
/Applications/Utilities/), search for the app name, select it, and click the Stop (X) button. Then force quit. After quitting, delete normally.
Case B: “ExampleApp” is required by macOS (System Apps)
- Apps like Safari, Mail, Music, and Books cannot be fully uninstalled – and you shouldn’t try. Even if you delete them from the Applications folder, macOS will re-download them during the next system update.
- Workaround: Hide them in a folder named “Unused” or disable them using Screen Time > Content & Privacy > Allowed Apps.
Case C: Kernel Extensions (kexts) or System Extensions
Modern macOS (Catalina and later) has moved away from kexts to System Extensions. To remove a stubborn network filter or antivirus:
- Go to System Settings > Privacy & Security > Profiles (if managed).
- Look for the app’s removal tool in
/Library/SystemExtensions/. - Boot into Recovery Mode (restart and hold Command+R), open Terminal, and use
kmutil unload(advanced – not recommended for casual users).
What About Apps Installed via Homebrew?
If you are a developer, you likely use Homebrew to install command-line tools and graphical apps (via brew install --cask). Homebrew has its own uninstall commands.
Uninstall a Command-Line Formula
brew uninstall wgetThis removes the executable and its dependencies (unless other formulas need them). To also remove unused dependencies:
brew autoremoveUninstall a GUI Cask (e.g., Visual Studio Code)
brew uninstall --cask visual-studio-codeBy default, this uninstalls the .app but keeps application support files. To completely purge everything:
brew uninstall --cask --zap visual-studio-codeThe --zap flag removes preferences, caches, and support files. It is the Homebrew equivalent of AppCleaner.
The Ultimate Checklist – A Complete Uninstall Workflow
To ensure no file is left behind, follow this 10-step checklist—regardless of which method you choose.
| Step | Action | Tool/Method |
|---|---|---|
| 1 | Quit the application fully | Activity Monitor |
| 2 | Check for an official uninstaller | Developer’s website or app folder |
| 3 | If no uninstaller, launch AppCleaner (or similar) | AppCleaner by FreeMacSoft |
| 4 | Drag the app into the uninstaller tool | Finder + AppCleaner |
| 5 | Review the list of detected files | AppCleaner window |
| 6 | Uncheck any shared files (e.g., ~/Library/Preferences/com.apple.dt.Xcode.plist shared by multiple dev tools) | Manual review |
| 7 | Click Remove | AppCleaner |
| 8 | Empty Trash | Finder |
| 9 | Restart your Mac | Apple menu |
| 10 | (Optional) Run a second scan with a different tool to confirm | CleanMyMac X free trial |
Common Mistakes and Myths – Debunked
Myth 1: “Macs don’t get cruft; you never need to clean uninstall.”
Reality: While macOS is better at self-cleaning than Windows, heavy apps (especially Electron-based apps like Slack, Discord, or VS Code) can leave gigabytes of caches. I once found 12GB of orphaned logs in ~/Library/Logs/DiagnosticReports from an app uninstalled three years prior.
Myth 2: “Deleting preferences will break other apps.”
Reality: Preference files are uniquely named using reverse-domain notation (e.g., com.google.Chrome.plist). Deleting one app’s .plist has zero effect on another. However, some apps share support folders (e.g., multiple Adobe apps share ~/Library/Application Support/Adobe/Common/). In AppCleaner, uncheck those shared folders.
Myth 3: “You must use a third-party uninstaller.”
Reality: You don’t have to. Manual Terminal cleanup works perfectly if you know what you’re doing. Third-party tools save time and reduce risk of human error. Choose based on your comfort level.
Myth 4: “Emptying Trash immediately after uninstalling is mandatory.”
Reality: Files in Trash take up zero operational space (they are not readable by apps). You can leave them for weeks. However, Time Machine will back up the Trash unless you exclude it. Empty when convenient.
Special Case – Uninstalling Built-in macOS Utilities
What about apps like Chess, Stickies, Voice Memos, or DVD Player? These are part of the macOS system and reside in /System/Applications/. Since macOS Catalina (2019), the system volume is read-only. You cannot delete these without disabling SIP, which is strongly discouraged for security reasons.
If you truly want them gone:
- Reboot into Recovery Mode (Command+R at startup).
- Open Terminal and run
csrutil disable(this weakens system security). - Reboot normally, then manually delete from
/System/Applications/. - Re-enable SIP by rebooting into Recovery and running
csrutil enable.
Better approach: Hide them. Create a folder named “System Apps” in Launchpad or move them into a subfolder of /Applications/ named “Apple Defaults.” Out of sight, out of mind.
The Environmental Impact – Why Proper Uninstalls Matter
There is a sustainability angle to uninstalling applications correctly. Orphaned files do more than waste space: they consume SSD write cycles (caches constantly update), run background launch agents (wasting CPU and battery), and increase Time Backup size. A typical creative professional’s Mac can accumulate 20–50GB of dead app files over two years. Removing them properly extends the life of your SSD and reduces energy use.
Conclusion: Choose Your Weapon
Uninstalling applications on macOS is a spectrum of methods, each with a different depth of cleanup:
| Method | Thoroughness | Difficulty | Best For |
|---|---|---|---|
| Drag to Trash | Low | Easy | Temporary removal, tiny apps |
| App’s own uninstaller | High | Medium | Adobe, Microsoft, complex software |
| Launchpad (App Store) | Low | Easy | Simplicity |
| Manual Library cleanup | Very High | Hard | OCD-level control, no third-party tools |
| Third-party utility (AppCleaner) | High | Easy | Most users (sweet spot) |
Terminal (find + rm) | Very High | Expert | Developers, scripting automation |
Homebrew --zap | High | Medium | Homebrew users |
Final recommendation for 99% of Mac users:
- Download AppCleaner (free).
- Drag any app you want to remove into AppCleaner.
- Review the file list and click Remove.
- Empty Trash once a month.
This workflow respects Apple’s design (no registry) while acknowledging the reality of scattered application files. You will keep your Mac lean, fast, and free from digital ghosts.
Now go forth and uninstall with confidence. Your SSD will thank you.